Note: I have posted a PDF version of this blog post on our website at http://www.appliedolap.com/downloads.
Back in the days when I started with Essbase, the entire Essbase server shipped on a single diskette. The Excel add-in shipped on a separate diskette. My first laptop with Essbase ran Windows NT and probably had a whopping 256 Mb of RAM. Since that time, technology has improved greatly and it is now common to find laptops with 4 Gb of RAM. Many of those laptops run 32-bit Windows XP which, even with a special configuration setting, can use only 3 Gb of RAM. In other words, 25% of the RAM on those machines is never used. However, the amount of RAM will keep continuing to grow and next generation laptops are now available with quad core chips and 16 Gb of RAM. To take advantage of these technological advances, we will need to leave Windows XP behind in favor of a 64-bit platform. The move to 64-bit operating systems gives us a good bit of breathing room for growth as, through the magic of mathematics, 64-bit raises the theoretical amount of addressable memory from about 4 Gb in 32-bit systems to around 18,000,000,000 Gb in 64-bit systems.
Microsoft owns the desktop and they have decided the future of the desktop is called Windows 7. Windows 7 is available in both 32-bit and 64-bit and I expect the 64-bit version to greatly outsell the 32-bit version. From our testing, it seems to be a solid operating system and much better than Vista. Unfortunately, Oracle does not support Windows Vista or Windows 7, and this presents a problem for Hyperion professionals who often want the Hyperion stack installed on their laptops. Of course, one alternative is to run VMWare or Windows Virtual PC with a supported operating system but, those solutions have their problems too. I have always preferred a local install over the VM solution but, unfortunately, initial attempts at installing the Essbase stack on Windows 7 failed. Thus was born this blog entry, with great thanks to my sons Billy Booth and Logan Tow, whose jobs at Applied OLAP included spending hour upon hour figuring out what worked and what didn’t work.
Laptop installations are normally used for development and, as such, there is no significant advantage to running the 64-bit stack. Further, our attempts to install the 64-bit stack ran into significant problems as the installer apparently detected the wrong chip type. As a result, I decided to install 11.1.1.3 (32-bit) on Windows 7 (64-bit). Unfortunately, we ran into some issues installing that version but, in the end, we were able to overcome the problems. In summary, here is what we found:
- We had to choose to ‘Run as administrator’ despite the fact that we were logged into the computer as an administrator.
- The install needed the Microsoft Loopback Adapter for the network settings to be detected properly (possibly due to the use of a DHCP to dynamically assign an IP address).
- OpenLDAP did not run as installed.
- The Java runtime did not install causing the Configurator to not run.
- The Apache http server did not install causing numerous problems with configuring and running Workspace.
It took a while for us to resolve these issues and make everything work, but I think we have it now. If you find any anomalies not mentioned in this blog post, let me know and I will try to update this document.
As part of writing this blog entry, we probably installed all or part of the stack dozens of times to make sure we had the steps down before publishing them. Still, it was rare that we got everything to work on the first attempt to configure, etc. As I wrote the blog entry (and personally installed the stack a half dozen times on fresh VMs), the steps got more refined. Instead of rewriting the blog entry each time, I left the body of the blog entry in the order of my first attempt and made notes/corrections where necessary. By leaving the blog entry in that order, you will have more background information if you see issues in your installation attempts.
At the end of the blog entry I created a checklist of the steps in the exact order that I believe are the fastest way to get the software running on Windows 7 64-bit. My final recommendation is to practice, practice, practice on a Windows 7 x64 VM before installing on your base system. With that being said, let’s get started.
First, download the necessary components from the Oracle Technology Network at
http://www.oracle.com/technology/software/products/bi/performance-management/index.html. You could also download the files from
http://edelivery.oracle.com. The primary difference is the license agreement you must agree to in order to download the software. If you have any questions on the legal agreements, I encourage you to check with your corporate legal department before proceeding.
If you download the files from OTN, download the files in the categories Hyperion Enterprise Performance Management System Foundation Services and Oracle Essbase. If you download files from Oracle eDelivery, you will need to choose the appropriate components from the Oracle Enterprise Performance Management System. I have included the eDelivery filenames in parentheses but keep in mind the contents of the files are probably exactly the same no matter the source and the steps below are basically the same as well.
The Foundations services products include:
- Oracle Hyperion Enterprise Performance Management System Installer, Fusion Edition
- Oracle Hyperion Enterprise Performance Management Architect, Fusion Edition
- Hyperion Reporting and Analysis Migration Utility
- Hyperion Reporting and Analysis Portlet
- Hyperion Shared Services
- Oracle Hyperion Workspace
- Oracle Hyperion Smart View for Office, Fusion Edition
- Oracle Hyperion Calculation Manager
The Oracle Essbase products include:
- Hyperion Provider Services
- Essbase Client
- Essbase Server
- Essbase Administration Services
- Essbase Studio
- Essbase Integration Services
- Smart Search
- Smart View/HVE
If you are interested in just using Essbase, you still need to install Shared Services from the EPM foundation in order to run Essbase Administrative Services. You can, however, configure Essbase to use standalone mode in order to bypass Shared Services for Essbase operations (although I expect standalone mode to eventually go away).
Once you have the necessary files downloaded, start by creating a temporary work directory. On my system, I created a directory named C:\temp\install. Once you have done that, unzip the System Installer (V17382-01.zip) into the work directory. Next, repeat the process with the 4 Foundation Services zip files
into the same directory. Those zip files are:
- V17397-01.zip
- V17369-01.zip
- V17370-01.zip
- V17371-01.zip
Repeat the same process for the Essbase Server and Client zip files. Those zip files are:
- V17388-01.zip
- V17389-01.zip
And repeat the same process for Provider Services and Smart View zip files. Those zip files are:
- V17390-01.zip
- V17402-01.zip
As you unzip each of these files, what is happening behind the scenes is that xml files are being added to the working directories. Additionally, files are being added to the assemblies subdirectory. The assemblies subdirectories contain the actual installation components. If you are prompted to overwrite a file, press
YesToAll to continue.
Note: If you are installing a different version of the software (or even the 64-bit version), the zip file names, which correspond to the Oracle Part Number, will be different.
Here is what my assemblies subdirectory looked like after unzipping the foundation services:
Next, locate and run the InstallTool.cmd file that is unzipped as part of the installer; in my directory structure, it was located in C:\temp\install. In Windows 7, you must run this as an administrator for it to execute successfully. To run as an administrator, simply right mouse click on the cmd file and Choose Run as administrator:
Note: In previous versions of the Oracle installer, you would see a nasty looking exception if you did not unzip product zip files into the installation directories before running InstallTool.cmd. The exception, java.lang.reflect.InvocationTargetException, sounds a lot worse than it really is. This exception appears because the Java runtime expects to find some installation code to execute and, as the code doesn’t exist in the installer directories, it throws a java exception. I am surprised that the installer does not do a better job of giving a more informative error message.
If you have properly unzipped files into the directories, you will get see the following Installer screen. Note the steps oriented along the left margin of the dialog that will help you keep track of your progress.
In our experience, the above step may result in an error if the Microsoft Loopback Adapter has not been previously installed. The Microsoft Loopback Adapter is essentially a dummy driver that substitutes in for a network card when the network card is not available. As I often use my laptop disconnected from the network on airplanes, I believe it may be necessary that you install the Loopback Adapter and, though I am not sure it is necessary, it certainly can’t hurt. If you need the Loopback Adapter and don’t have it installed, the error message may look like this:
If you encounter this issue, follow these steps to install the Microsoft Loopback Adapter:
- Open the Device Manager from the Control Panel.
- Select Action, Add Legacy Hardware from the menu.
- In the resulting wizard, click Next.
- Choose to install the hardware that you manually select from a list and click Next.
- Select the Network adapters category and click Next.
- Select Microsoft as the Manufacturer and Microsoft Loopback Adapter as the Network Adapter and click Next.
- Click Next to install the adapter and then Finish to close the wizard.
- Restart the InstallTool again selecting Run as administrator.
Even if you don’t encounter issues with the initial install, I recommend installing the Loopback Adapter if you are running the Hyperion stack on your laptop.
Once you have successfully launched the Welcome tab, press Next to proceed to the Destination tab:
Choose the location where you would like to install the Hyperion components. The default HYPERION_HOME location is C:\Hyperion. Press
Next to proceed to the Installation Type tab of the Installer:
If you select
Choose components by tier and press
Next, the Product Selection tab of the Installer will look like this:
Otherwise, if you select
Choose components individually and hit
Next, the Product Selection step of the Installer will look like this:
Note that the products that appear in the selection box are based on the product zips that you unzipped into the installation directory.
Once you have selected the products to install, press the
Next button to proceed to the Confirmation tab of the Installer:
Click
Next to begin the installations. The progress is reported in the dialog and took something like 10 to 20 minutes on the VM on my laptop. After the installations are complete, the ‘Summary’ step shows the status of the installed products:
At this point, I pressed the
Configure button to launch the EPM System Configurator and nothing happened. I also tried starting from the Windows Start Menu (Start Menu, All Programs, Oracle EPM System, Foundation Services, EPM System Configurator) and again, nothing happened. After some investigation, including a look at the batch files that launch the Configurator and an attempt to launch from the command line, it was determined the setJavaRuntime.bat was not setting the JAVA_HOME properly. A quick check of the %HYPERION_HOME%\common showed that it did not have a JRE directory.
This is the first major issue installing on Windows 7. To work around the issue, copy a version of the JRE from a working Hyperion install. I checked another 11.1.1.3 machine we have running in the office and it had the JRE version 1.5.0_12 installed. I copied the JRE directory from that machine onto my new Windows 7 machine.
The second major issue installing on Windows 7 is that the OpenLDAP service, which at this point is installed, did not and will not start. This is due to some missing registry entries that did not get set properly during the installation.
In a 64-bit environment, add the following registry entries, with their corresponding values, to HKEY_LOCAL_MACHINE\SOFTWARE\Wow6432Node\OpenLDAP\Parameters:
- ConfigFile - C:\\Hyperion\\products\\Foundation\\openLDAP\\slapd.conf
- URLS - ldap://:28089
- DebugLevel - 0
If you are working in a 64-bit environment, the entries will need to be added to the Wow6432Node regardless of whether you're installing 64-bit or 32-bit Essbase. In a 32-bit environment, the procedure would be exactly the same, only everything goes into the HKEY_LOCAL_MACHINE\SOFTWARE\OpenLDAP\Parameters node.
Once you have made the changes to the registry, make sure everything is working correctly by starting the OpenLDAP service.
Once the Java JRE and OpenLDAP issues are resolved, re-launch the Configurator using
Run as administrator.
The Configurator opens and displays the components to configure:
Select
Next to start the configuration process. The next few screens will gather information required to configure the system. First, the system prompts for the Shared Services database information. In my 11.1.1 install, I used Oracle 11g Enterprise. I found that database to be a bit heavy for the lightweight tasks I needed it for on my laptop, so this time I am going to use SQL Server 2005.
I always write down the settings so I don’t forget them:
Database Type: Microsoft SQL Server
Server: win7x64
Port: 1433
Database: hyperion
Username: hyperion
Password: Hyperion
Note: In SQL Server, I had to create the hyperion database before I could connect with the Configurator. As this was a fresh install of SQL Server, I also had to launch the SQL Server Configuration Manager (Run as administrator, of course), enable TCPIP and, under TCPIP properties, enable the IP addresses individually. If you skip this step, the JDBC driver will not be able to connect to SQL Server and you will encounter errors during the configuration steps.
Press the
Next button and you are prompted for common system settings:
Press the
Next button and you are prompted for specific database system settings for Calculation Manager, Workspace, EAS and Essbase Studio:
As I am using the previously configured database, I didn’t have to change anything on this screen. Press the
Next button to go to the next screen which prompts you for the Workspace Repository directory (assuming you chose to install Workspace):
Press
Next to select the application server:
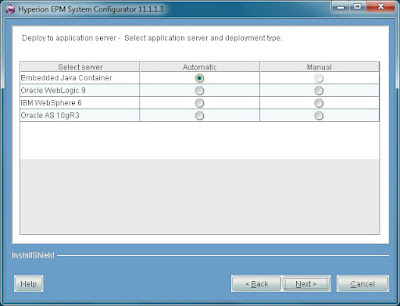
The Embedded Java Container is Apache Tomcat 5.5.17. With the acquisition of WebLogic by Oracle, I expect that we will all see WebLogic quickly become the favored application server for Hyperion products. For laptop or local deployments, especially on Windows 7, Apache Tomcat does basically everything we need it to do.
Press
Next to move to the port selection step of the Configurator.
I typically use the default ports for the services. Press the
Next button to advance to the next step in the Configurator which prompts for the Workspace port configuration:
All had seemed smooth sailing, but this is where I encountered my third major problem installing on Windows 7. When I pressed
Next, the Configurator did not advance. Upon further investigation, it appears the Apache http server did not get installed into the Hyperion common directory. Once again, I went to another machine where I had previously installed 11.1.1.3 and copied the entire common\httpServers subdirectory into my Windows 7 common directory. Once those files were copied, I was able to advance to the next step in the Configurator which sets up the Essbase ports.
This step of the wizard has changed a little since the 11.1.1 installation. In that version, there was a checkbox for setting the ARBORPATH variable. That checkbox is no longer available. However, the option to deploy Essbase in standalone mode is still available. When I do this install on my real laptop, I plan to use standalone mode so I don’t have to run Shared Services and have it take up resources. On this Windows 7 VM, however, I am going to use the default setting.
Finally, the information gathering is complete and you have one final chance to confirm everything before the configuration starts:
Press
Next and let it rip! Once it is complete, here is what the dialog should look like:
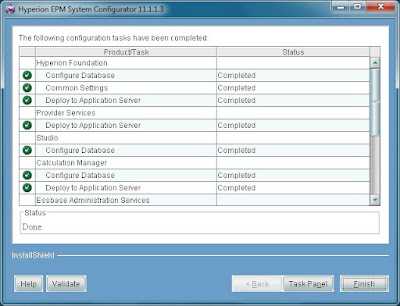
Now that installation is complete, here are the services that are running:
Note that Calc Manager and Workspace Web Application did not start on my machine. I tried restarting them and got Calc Manager to work but I didn’t get Workspace running. The core stack, except those items, were installed and running properly.
After trying the restarts above, I pressed Validate on the Configurator and ran the Hyperion Validation report. Everything appears to pass except Essbase Studio and Workspace. The normally recommended remedies did not work. I did a bit of digging in the logs to see if I saw anything strange and found a reference to the http server configuration files not being accessible. Sure enough, the entire common\httpservers directory structure was marked as read-only and, as a result, they could not be written. Further, I found that my original copy attempt was from a different installed drive, so the configuration items in the file were looking at an incorrect drive. As the configuration failed due to the configuration files being read-only, I don’t know if the drive letter would be corrected during the configuration. I would recommend copying the common\httpservers directory from a machine where the files are installed on the same drive/directory structure.
Note: if the configuration of any component fails, restart the Configurator or you may encounter JDBC issues connecting to the databases.
Once the configuration has completed successfully, press the
Validate button to run the validation utility. Below is a screenshot that shows all green (which is what you want). Note that I had to start the Essbase Studio server manually as a service did not get installed for that server.
One final anomaly we found on Windows 7 is that the EAS Client does not seem to install properly. However, the Java Web Start of EAS works very well on Windows 7 assuming you have a Java JRE installed (other than the one that you copied into the Hyperion\common subdirectory). To launch via Java Web Start, I typed the appropriate URL into the browser:
The EAS console downloads and launches. The only difference between the JNLP version of EAS and the locally launched version of EAS is that, for security purposes, the server that it talks to is limited to the server from which it was launched.
After following these steps, I was up and running with Essbase and the other products I typically use. To summarize the major differences between installing on the Windows 7 (unsupported by Oracle) and Windows 2003 Server (supported by Oracle):
- You must run everything using Run as administrator.
- The Java JRE does not get installed and you must copy it from an install on a supported Windows platform.
- The Apache HTTP server does not get installed and you must also copy it from the same directory of an install on a supported Windows platform (and assure the copy is read-write).
- OpenLDAP does not get configured properly and you must manually configure the registry and start the service.
- You must launch the EAS client using Java Web Start.
To summarize and put the steps into the exact order you need to successfully install and run on Windows 7, follow this checklist.
Windows 7 / Essbase 11.1.1.3 Installation Checklist
- Confirm your relational datastore is setup properly, that a database/username/password has been created and configured to hold the Hyperion configuration information, and that you can connect to it via TCPIP.
- Confirm the Microsoft Loopback Adapter device is installed or install it if necessary.
- Create a Hyperion\common directory where you intend to install the Hyperion products. Copy the JRE and httpServers directory in from a successful install on a supported operating system. Set the files in httpServers to be read-write if they are not already. Confirm that the following file is read-write: common\httpServers\Apache\2.0.59\conf\httpd.conf
- Unzip the Oracle Installer zip into a temp directory. Then, unzip the product zips you wish to install into the same directory.
- Run the Oracle installTool.cmd file ‘as Administrator’. Choose the products you want to install and let the installation wizard install them.
- Add the OpenLDAP registry entries and start OpenLDAP.
- Start the EPM System Configurator ‘as Administrator’ and run through the configuration steps in the wizard.
- If you installed Essbase Studio, start the Essbase Studio service manually from the menu.
- Make sure the appropriate services were installed and running on your machine. Run the Validate button to check your results.
- If you installed EAS, start EAS from Java Web Start to validate it is running.
In the end, I did not get the entire system configured with a single launch of the Configurator due to an error configuring the Foundation database. According to the configuration logs, it appears the error was due to a problem with the initialization of OpenLDAP; a quick reconfigure worked perfectly. In any case, I hope this tutorial leads you to a smoother installation experience. Please send me feedback/corrections at
timtow@appliedolap.com and I will work to get them incorporated into this document.


